
I have always configured and used Android SDK from Eclipse. In fact, ADT (Android Development Kit) bundle now comes with Eclipse IDE pre-configured for Android development. This makes using the SDK very easy. Options like configuring SDK manager and virtual device manager are available right from Eclipse menu.
However, I had a requirement where I wanted to run only Android emulator and not IDE. The Android SDK site has all the information to do this, but not in one easy to find place. So I thought I will write about it, for my own reference.
Downloading only SDK
First thing to do is to download only Android SDK. The download page has the option for downloading ADT bundle (with IDE) prominently displayed. If you want to download only SDK, then click on ‘Use an Existing IDE’ link, which will reveal the option to download only SDK tools.
Downloading Platform Tools and System Images
However, downloading SDK took is not enough to run the emulator. You now need to download platform tools. It is explained here. You first need to run the SDK manager. Go to <sdk_folder>/tools folder. In Window, run ‘SDK Manager.exe’. In Mac, run the command – ‘./android sdk’.
This opens up the SDK Manager. It shows tools and packages available for download and install. You will see that SDK Tools are already installed. Select platform tools and build tools options under Tools category You also need to select and install at least one Android package, this is indicated by ‘Android <version_number>’.
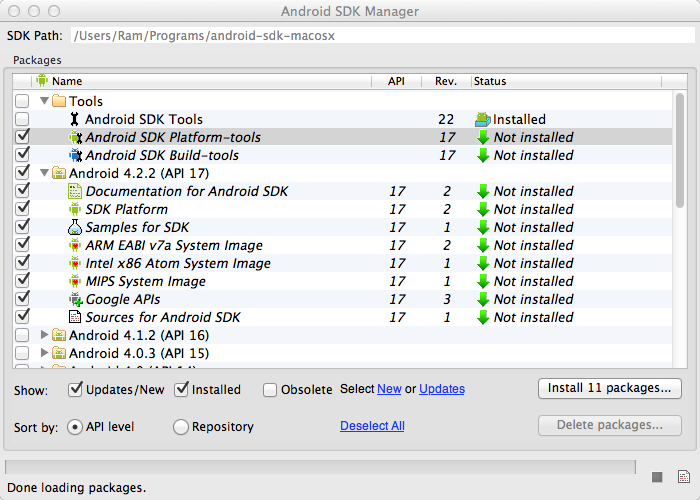
Note that you must select SDK Platform and at least one System Image. Install the packages. This might take a long time if you had selected all the options.
Creating Virtual Device
From tools folder execute ‘android avd’ command. This will open AVD Manager. Click on New button to create a virtual device. See Managing AVDs with AVD Manager.
Starting Emulator
Once you create a virtual device in AVD Manager, you can select that device and click ‘Start’ button to start the emulator using that virtual device.
If you want to start the emulator outside AVD Manager, go to tools folder and run ’emulator -avd <avd_name>’ (replace <avd_name> with name of the virtual device you created) command. See Starting and Stopping the Emulator .
Installing Application
Go to platform-tools folder and run the command – ‘adb install <path_to_apk_file’. This will install the application in the emulator. See Installing Applications on the Emulator
When installing the application if you get error – adb error : device not found. then try to stop adb and start again –
To stop adb > ‘adb kill-server’
To start adb > ‘adb start-server’
Then try to install the application again.
-Ram Kulkarni